Pages

Showing posts with label Eggs. Show all posts

Thursday, July 5, 2012

Summer Swedish Balcony Salad


This morning it was raining - tipping it down. A soggy July, hot on the heels of one of the wettest Junes on record! Then this afternoon the clouds parted and out came the sun. After work I headed to the park to take it in. On getting home I knocked up this quick, Swedish inspired salad with the fridge contents, and some fresh pickings from the balcony. The oak leaf lettuce, dill, parsley, and sprouts - are all the fruits of my semi attentive labour

Ingredients

Oak leaf Lettuce
Dill - finely chopped
Parsley - finely chopped
1/3 cucumber - seeded and diced
2 beetroots - diced
1 spring onion - thinly sliced
some fennel seeds
Some crumbled feta
Poppy seeds
a squeeze of lemon juice
a dollop of good olive oil
a drizzle of honey

To Serve - a hard boiled egg and some sprouted mung beans

Method

Mix the lemon juice, olive oil and honey in a small dish until blended. Put the rest of the ingredients in a large bowl, drizzle over the dressing and toss. Top with sprout and boiled egg on the side. Hardly a recipe to change the world, but I had to start back somewhere.

Wednesday, May 11, 2011

Celeriac & Potato Rosti

Another Brunch Recipe
It appears that of late I'm writing a lot of brunch recipes. Maybe that seems more romantic than calling them light dinners for one - which is what they are!

So celeriac is a pretty ugly vegetable, maybe that's why I have never cooked with it much. Generally it's treated in a similar manner to a potato. That's where the idea came for combining the two in a lovely rosti.

I won't lie this fell apart slightly when I flipped it over - still tastes great and works really nicely with the poached egg and baby rocket from my balcony.

Ingredients - Serves 1
1/4 of a head of celeriac - outer skin removed and grated
2 small potatoes - grated
Pinch of thyme finely chopped
1 egg yolk

To Serve
baby spinach or rocket
1 poached egg

Method
Pop the grated potato and celeriac into a clean tea towel. Push it all into the centre and then cover with the teatowel. Give it a really good squeeze to push out the excess moisture. Put into a large bowl add the thyme, egg yolk and seasoning. Mix thoroughly.

Heat a small amount of olive oil over a medium heat in a non stick pan. Spoon the mixture onto the pan into whatever size you want. I think mine were however too large, making it harder to flip over. You want to keep them pretty thin so that they'll cook right through. Press down firmly with a spatula. Give them about 3-4 mins on each side until a rich golden brown.

Serve with a poached egg sitting on top of some fresh baby rocket or spinach. My secret to perfect poached eggs (well I'd say good not perfect) First really fresh eggs. Secondly when your water reaches a good strong boil, twirl the water in the pan to create a mini vortex. Pull the pan off the heat. Then gently slide the egg into the spinning water from a cup. The movement of the water will keep the egg white together in a natural shape and will stop it from spreading out and getting thin. Always drain the egg well on kitchen towel to avoid soggy bread/rosti.

Enjoy

Thursday, April 28, 2011

Home-cured Bacon Carbonara

My favourite pasta dish of all time


So yes Carbonara is my favourite pasta dish of all time. I've been making it for years. Every so often will get a craving for it that won't go away until I've made myself an enormous bowl of creamy spaghetti. I'm pretty sure it has to be spaghetti - tagliatelle at a push.


Now the most important ingredient in this dish is indeed the bacon. Just to say the pig wasn't a saddleback but a rarebreed Tamworth from the Wishing Well Farm. The University of Bristol carried out a taste test of all breeds of pigs in 1999 and the Tamworth came out on top. They are now in the process of getting a sow to start breeding. Most special about this particular pig is that, it was their first pig. 


We saw Ed Hick butcher a side of the animal at Inishfood in Donegal. Then we all got down to curing our own bit of bacon. I chose a cure that had some bay and juniper in it. The meat was pierced to allow the cure to get deep into the meat. Then you rub the cure well into the meat with your hands. Seal the meat in an airtight container and store in a cool dry place for two weeks for the curing to take effect. The meat needs a turn everyday to ensure both sides as evenly cured. I stored mine in the fridge.


The resulting piece of meat was just some of the finest bacon I've ever eaten. It's nice to have a large piece of bacon to cut from as you can choose how to cut it - ie rashers or lardons. I got 3 breakfasts and a carbonara for two from my piece. Sadly I forgot to weigh it at any point of the process - whoops. The cure brought lovely notes of bay to the meat. Also the fat when fried or grilled turned a lovely dark rich brown - whether that's down to the meat or the cure I'm not sure. There was dark brown sugar in the cure so that might well be it.


I will def be looking into curing my own bacon again providing I can find the same quality of meat to do it with. That might be some tall order though, given the tender love and care this pig received I'm sure.


Now onto the recipe which I took from Donal Skehans new book - Kitchen Hero. Like him I've experimented with many versions before often involving ingredients such as wine, cream, cheddar. The pared back version is more true to the genuine Italian version, and just as tasty.


Ingredients - Serves Two
3 egg yolks - broken up
5 rashers sliced / or pancetta / or my amazing bacon!
Spaghetti for 2 cooked al dente
Parmesan cheese


Method
Cook your spaghetti in plenty of well salted water. While the pasta is cooking fry up your bacon till it's nice and crispy.


Drain the spaghetti and reserve about a cup full of the cooking liquid. Return the pasta to the hot pan - but don't return the pan to the heat. Stir through the bacon and a little of the cooking water. Then quickly stir through the egg yolks. The heat from the pasta cooks the egg yolks and makes a nice sauce that coats well. Stir quickly though to ensure you don't scramble the egg.


Serve with a good healthy amount of freshly grated Parmesan and a good crowd of black pepper.


This dish is full of flavour that belies it's simple ingredients, it will be a while before I go back to my more extensive ingredient list.

Tuesday, March 1, 2011

Pancake Stack with Toasted Almonds and Maple Syrup

Today is Tuesday


Some confusion arose this morning as to - firstly what day of the week it was and then subsequently - was this pancake Tuesday? I decided it was and went off to fix myself a massive coffee and what turned out to be an equally enormous stack of pancakes.


It is pancake Tuesday - but not until next week, so for once I am ahead of the game and have this recipe for you to try on the real pancake Tuesday!
Ingredients
Serves 2 - makes 10 mini pancakes (diameter 10cm!)
55g plain flour
1 egg
100 ml of milk with 35 ml cold water added in
melted butter - around a tablespoon
Maple Syrup
Large Handful Toasted Almonds

  • Sieve the flour into a large bowl. Add in a pinch of salt if you like.
  • Make a well in the centre of the sifted flour. Break the egg into the centre. Break up the eggs with a spoon and then gently stir, so that the egg pulls in a little flour with each stir. Continue to do this until the mixture is getting thick.
  • Add in a little of the milk mixture - continue until all the flour has been incorporated. If you don't rush then you should have a nice batter that has little lumps. If you do have lumps give it a whisk with a balloon whisk.
  • Allow the mixture to rest for a few minutes if you did use a balloon whisk.
  • Heat up a small non stick frying pan on a med/high heat. Add in a small nob of butter. When it begins to bubble add in a spoonful of the pancake mixture. Swirl around to coat the base of the pan.

  • If you have the pan heated up well - the pancake should take 230 seconds or so on each side. You can see the batter on top slowly turning opaque as it cooks through.
  • Stack pancakes in a warm oven on a plate covered with kitchen towel until you have a huge pile of pancakes. Then enjoy with your topping of choice - sugar and lemon, maple syrup, nutella, banana and Chantilly cream.

Friday, February 4, 2011

Raspberry Creme Brullee

Irish Foodies Cookalong
Love, love, love
So long I have tried and failed to participate in an Irish Foodies cookalong. Today I have succeeded in participating, though it may be conceived as cheating, I'll submit it anyway. Our best previous attempt was me and Lola trying to enter us the Christmas cookalaong. Some mince pies were made - then stew went in the oven whilst we got pretty drunk, then turned the oven off and went to the pub - total cookalong fail.

So today I made these creme brullees - in Cooks Academy I'll admit so that's possibly where the cheating element comes in. I did however match them with nice romantic napkins and seasonally inappropriate raspberries. At least I'm not down the pub already!!

Sunday, September 12, 2010

Chorizo and Waffle Hash

Chorizo & Potato Waffle Hash

So the first post we ever made was the Waffle Omelette. At the time I wasn’t sure about having a blog, but decided to give it a try. I posted up the waffle omelette and then emailed the blog to Lola - and the rest is history, since then I’ve mostly posted my more serious recipes and pretended I never ate convenience foods. I do love potato waffles though - and have a box in the freezer for food emergencies- actually who am I lying to here - they’re there for hangover emergencies!

We made this the morning / afternoon after our dinner party and LOVED it, in the way you can only love food the morning after the night before.

Picture doesn't do this justice!
Serves 2
6 pieces of chorizo
1 onion
some garlic crushed
some red and yellow pepper - diced
Fresh thyme
fresh parsley
6 Birdseye potato waffles
2 eggs

Fry the  onion over a med/high heat along with the chorizo, after 2 mins throw in the garlic - cook for another two mins or so and then add in the thyme and peppers. While you’re doing this you can grill the waffles (it’s the only way for me!) Then in a separate pan- fry up two eggs as you like them (both our yokes cracked - but we weren’t prepared to start again.

When your waffles are crispy and golden brown - break them up - add to the chorizo and onion mixture - pile onto two plates top with a fried egg and a generous sprinkling of black pepper - and you‘re good to catch the re-run of x-factor.

Hash is an American invention - yes? Invented by cowboys I believe!

Hazelnut Meringue with Apricot Filling

Ah lovely background with mini - accordian and pack of fags!
Ingredients
6 egg white
12oz caster sugar
4 oz ground hazelnuts
6oz dried apricots soaked overnight in water
1 inch of cinnamon
Juice of two oranges
2 inch piece of orange rind
2 tablespoons of brown sugar
500 ml single or double cream
Extra hazelnuts for decorating - I used 18 - that was 1 oz!
3 cake tins - lightly oiled and lined with parchment on the bottom.

I started out by toasting the hazelnuts until golden - toast a few extra as you’ll eat a few. Pop them out of their skins and roughly blend them in a  blender, not forgetting to keep a few extra whole over to decorate the top of the dessert when done.

Separate out your eggs - being super careful not to allow any yolk in - otherwise your meringue will fail miserably. Also worth washing your utensils just before starting the meringue - as any dirt or grease could affect the fluffiness of your egg whites- leaving you with one flat meringue.

Put the 6 egg whites in a bowl / food processor with whisk attachment - and whisk until  they form soft peaks. Then slowly add in the caster sugar spoon by spoon. The whites should stay smooth and get a little glossy. Then fold in the ground hazelnuts gently with a metal spoon. 

Spoon the mixture into the tins and bake at the middle of the oven for 30 mins at Gas Mark 5.

Now make the apricot filling. Drain the apricots over a bowl. Add 4 tablespoons of the soaking liquid into the pan with the fruit cinnamon, brown sugar, orange peel and juice. Bring to a gentle simmer and let it bubble away for about 20 minutes until the apricots are breaking apart. Add more of the soaking liquid if it appears to be getting too dry..

Remove the meringues from the oven - they should have a light brown tinge. Leave to cool in the tins for 15 mins before turning them out onto a wrack to cool fully. Just before serving assemble the meringue - put one meringue with half of the apricot mixture and a third of the whipped cream. then another meringue followed by the rest of the apricot filling, more cream, meringue and then the rest of the cream and a few toasted hazelnuts. This dessert is pretty sweet - so if you prefer a less sugary dessert - I recommend you try something else - but for sugar junkies - this will be a tasty hit!

Sunday, August 29, 2010

Mum's Chocolate Cake

Cake is gonna get you!
Here's Cake-ie!

My mum has been making this cake ever since I can remember - I think she got the recipe from Martha down the road - but I'm claiming it for my mum. Any occasion of note which involved kids saw this cake getting whipped up. It's a moist and delicious and appears a lot more complex than the simple recipe that makes it. The secret ingredient is black treacle - I won't hide it from you! 

Ingredients
9oz Caster Sugar
9oz Self Raising Flour
9oz Butter
3 eggs
2 tablespoons of Cocoa Powder
1/2 teaspoon of Baking Powder
1 tablespoon of Black Treacle
A dash of milk

For the icing
5oz of Icing Sugar
1.5oz Cocoa Powder
2oz Caster Sugar
3 tablespoons Water
3 oz Butter

Preheat the oven to Gas mark 4/180oc, and grease 2 circular cake tins, and line the bottoms. I used cake tins that had a diameter of 10 inches.

Sift the flour, baking powder and cocoa powder together in a large bowl. Add in the softened butter, eggs, treacle and the milk. Blend them all together until very well mixed, add more milk if the mixture appears too chick. Spoon into the tins and bake at the centre of the oven for 40 mins. 

Meanwhile you can prepare the icing. Sift the icing sugar and the cocoa powder into a bowl. Place the caster sugar, water and butter in a small pan.

When the cake is cooked it should spring up from a gentle press down, or a skewer should come out clean when poked into the centre. Remove gently form tins and allow to cool.

To make the icing - melt together the contents of the pan and then mix into the icing sugar mixture. If the mixture is a little thick for spreading - just add the smallest dash of boiling water and that should loosen it out a small bit. Similarly if it's to runny you could sieve in some more icing sugar. Spread over and between the two cooled sponges and you're done.

Decorate with chocolates and marshmallows for kids - or give it a dusting of icing sugar or cocoa powder for the adults. You can also make this in a tray and slice out little squares. It looks a bit like a scary ominous monster in this photo I think! It's the cake for every chocolate cake moment

Friday, August 20, 2010

Pecan & Banana Loaf

Bananas!
I used to play in a band - where I met my boyfriend and the lovely Jane and Andy. There was a song that had a strange stop in it - and the only way we could all come back in at the right time was for Jane to sing the word - Bananas! Then it became everyone's favourite part of the song - good memories!

Ingredients
6 oz softened butter 
6oz golden caster sugar 
3 eggs 
5oz of self raising flour 
3oz ground almonds 
½ tsp baking powder 
100ml/3.5 fl oz milk 
2 small really ripe bananas
2oz pecan nuts – chopped

Pre-heat your oven to 160c/Gas Mark 3. Grease and line a 2lb/900g loaf tin.

To make the loaf batter simply lob all the ingredients into your trusty vintage Kenwood Chef (Did I mention I was given a lovely old Kenwood Kitchen Chef from my parents friends?)

Whisk together until you get a lovely batter. Then lob this into your loaf tin.

Lob this into the oven for 45-50 minutes.

Then lob into your face – after a modest amount of cooling on a wrack. Yummy 

You could always add some icing or frosting if you like – but I thought this was perfectly sweet light and spongy – maybe next time another banana.

This picture is silly and I love it! It's Friday let's all be silly

Tuesday, July 13, 2010

Smoked Mackerel Kedgeree

Breakfast, Lunch and Dinner


This is a traditional english breakfast dish but I just ate it for dinner and it hit the spot nicely! There is no need to be pedantic about what time of day things should be eaten, I always think!

You can make this with any smoked fish but if its raw fish make sure to poach it in milk for 8-10 mins previous to adding it in to the rice.

Serves 2

Ingredients

2 smoked mackerel fillets
2 eggs
1 medium onion
2 cloves garlic
1 inch piece ginger
1 yellow or red pepper
1 red chili
1 teaspoon garam marsala
1 teaspoon curry powder
160gr basmati rice (I used wholemeal/brown basmati, but you could use white just as well)
1 bunch fresh coriander or dill

begin by washing the rice thoroughly
Then boil it according to the cooking instructions on the pack. Wash the eggs, then, using the tip of a very sharp knife, drill a small hole in the end of each egg. This will stop them cracking when you drop them into boiling water. When there is 10 minutes left to go on the rice, add the eggs in their shells to the rice and cook the rice and eggs together (just handier this way!).

Chop the onion, garlic and chilli finely, and grate the ginger. Saute everything in a frying pan until the onion is soft and transluscent. the add the spices and the chopped pepper.

When the rice is cooked, remove the eggs and set aside. Add the drained rice to the frying pan with the onion etc in. Stir well. Flake the mackerel fillets into chunks and remove the skin. Add this to the rice mixture and stir well.

To serve, peel the shells off the eggs, cut them in half and put them on the plate as a garnish to the kedgeree. Chop the coriander of dill and sprinkle this over just before serving.

Yet another breakfast/brunch treat! We must have a brunch party soon to try out all these recipes on real people!


Tuesday, June 22, 2010

Lemon Meringue Pie

Guest Chef no.5 - Jane Fitzgerald


Jane Fitzgerald is a mutual friend of both Lola and mine - we met her on the first day of college also, though not over a cigarette. She's a great cook, and prepared a fabulous dinner for us and a few other friends last Saturday. The entire meal was wonderful but the piece-de-resistance was an enormous Lemon Meringue Pie, it's size was matched only by how delicious it was.

She kindly agreed to share the recipe with us below, enjoy ......

Lemon meringue pie - a 50's housewife's piece de resistance. Don't be scared off by the long recipe, it'll be well worth the effort, and isn't too laborious if you have a food blender.

Ingredients:
For the pastry:
4 oz (110 g) plain flour
pinch salt
2 oz (50 g) butter, at room temperature and cut up into dice - sized cubes
1 -2 tablespoons of water

For the filling:
grated zest (see my tip below!) and juice of 2 large lemons
3 level tablespoons cornflour
2 oz (50 g) golden caster sugar
3 large egg yolks
1½ oz (40 g) butter

For the meringue:
3 large egg whites
6 oz (175 g) golden caster sugar
1/2 teaspoon vanilla essence

Serves 6.

Pre-heat the oven to gas mark 5, 375°F (190°C).

You will also need a 1 inch deep pie tin with sloping sides, measuring 7½ inch at the base and 9½ inch at the top. It helps if it's a nice dish as you'll be serving the pie in it.

Start by making the pastry. Sieve the flour and a pinch of salt into a large bowl. Then add the butter, cut into smallish lumps, and, using only your fingertips, lightly rub the butter into the flour until it looks like breadcrumbs. Sprinkle in some cold water – about 1 tablespoon. Knead the pastry, adding a few more drops of water until you have a smooth dough that will leave the bowl clean. Or if you're lucky enough to have a food processor, mix the butter, salt and flour together until it does the same thing, then add the water. If you have enough time, leave it wrapped up the fridge for half an hour as this makes it easier to roll out. This also gives you time to put your curlers in and do your nails for when your husband comes in from a hard day at the office.

Next, roll the pastry out to a circle about ½ inch larger all round than the rim of the tin and lay it out in the tin. Make sure not to leave any air under it, and press a fork around the entire rim so that the pastry doesn't come away from the tin as it cooks. Then prick the base all over with a fork. Bake in the oven for 20-25 minutes, or until cooked through. Remove the pastry case from the oven and immediately lower the heat to gas mark 2, 300°F (150°C) for the meringue.

Now, for the filling, otherwise known as lemon curd (you can have anything left over for your toast in the morning!). Measure 10 fl oz (275 ml) cold water into a jug, and spoon the cornflour and sugar into a bowl. Add enough of the water to the cornflour to make a smooth paste, then pour the rest of the water, along with the grated lemon zest, into a small saucepan. A little tip here. If you have a hand held blender and hate zesting lemons, do this instead. Using a peeler, peel the lemons, taking care not to peel off too much pith, then put this in a hand held blender and whizz around. Hey presto - hassle free zest.

Bring the mixture in the saucepan to the boil, then pour it gradually on to the cornflour, mixing all the time until it is smooth. Now return the mixture to the saucepan and bring back to the boil, still mixing. Next, simmer very gently for about 1 minute, stirring all the time to prevent any lumps forming. Then remove the pan from the heat and beat in the egg yolks, lemon juice and, finally, the butter. Pour the lemon mixture into the pastry shell and spread it out evenly.

Finally, for the meringue, use a large, roomy bowl (or a blender) and whisk the egg whites until they form stiff peaks. Now whisk in a quarter of the sugar at a time, then spread the meringue to the very edge of the pastry rim with a spatula, so that it seals the edge completely. Use a spatula to smooth out the meringue, or add a few swirls. Cook in the oven on the centre shelf for 35 - 40 minutes, or until the meringue turns a golden beige, and is squishy on the inside and crunchy on the outside.

I prefer to serve this luke warm, and all on its own.

It's a good thing that I'm salivating as I type!

This recipe is taken (mostly) from Delia Smith’s Complete Cookery
Course and Delia Smith’s Complete Illustrated Cookery Course.

Sunday, June 20, 2010

Huevos Rancheros

Viva Mexico!


Apparently Mexico are doing pretty well in the World Cup right now... I have managed to not watch a single match so far... oops!

I figure most Irish people are behind Mexico, what with the green strips and beating France 2-0 an all... Also on this blog we seem to have developed a serious liking for Mexican food. So I decided to whip up some Huevos Rancheros this sunny Saturday morning. Perfect for brunch! They went down a treat and made us love Mexico even more, I'm now even contemplating a visit!


Serves 1 hungry person, or two not so hungry people. All quantities can be doubled or tripled depending on how many eggs you want for brekkie!

Ingredients:
2 eggs
1 tin chopped tomatoes
1/2 a red chili
1 small red onion
2 cloves garlic
2 flour tortillas

Start by making the tomato sauce. Chop the onions, garlic and chili (take out the seeds if you don't want it too hot!) and saute in some olive oil in a frying pan until the onions are soft and translucent. Then add the tin of tomatoes and stir everything together. Simmer for about 10 mins or until the sauce 'comes together'.

Push the sauce to one side of the pan and add a bit of olive oil to the exposed pan. break the eggs into this oil and fry them. Meanwhile, in another frying pan, heat a teaspoon of oil and heat up the tortillas, one at a time for 30 seconds on each side. When they are done and browned transfer them to a plate. by this time your eggs should be nearly done. Leave them sunny side up, even if, like me, you usually don't eat them like that. Place them on top of the tortillas and then top the eggs, covering the yolks with the hot sauce. This will cook the tops of the eggs.

Serve topped with some grated cheese if you like, or some pinto beans, or, like I did, a bit of avocado.

Muchos Yummios (sorry!)

Monday, June 14, 2010

Deep Fill Leek, potato & Bacon Omlette

Lest I forget (completely) 
My photo archives show me some very tasty dishes I have cooked over the last year - but due to circumstances they never reached the pages of this blog in sufficient time - and I've forgotten how exactly how I made them, I have a good idea though. So no longer will these photos lie on my hard-drive unloved and unseen - the will be released onto the pages of our blog - and if anybody wants further details - just ask - and I'll do my best to remember!

Not a recipe
I guess I mandolin-ed  a few spuds – chopped some leek – cooked the leek in some butter with thyme and garlic – then added the spuds and cooked until they were soft. Then when this was all soft and golden and delicious – I whisked up some eggs with a little milk and seasoning  - then I chucked these over the leek and suds allowed to cook on the heat for a while. I probably then grated some cheese on top – then banged it under a hot grill which made it go all puffy and crisped the top,

Then I dressed some rocket leaves with balsamic vinegar and olive oil and shaved some parmesan and tomatoes. There appears to be some bacon in there too – that would have been fried up just before adding in the leeks I guess.There may well have been some chives in there  - or parsely

The one thing I remember for sure was – that is was delicious. Oh yes! It would have been a shame to let this recipe slide past just cause I’m forgetful

Wednesday, June 2, 2010

Pork and Chorizo Hash

Triple Pork Breakfast

Well it's not a fry - which is the traditional way of eating three types of pork first thing in the morning, I guess we could bill this as slightly healthier alternative, just! 
Ingredients
Serves 6

1 large white onion - Roughly diced
4 streaky rashers - thinly sliced
Fresh thyme
3 inches of chorizo - cubed finely
Left over pork - diced
1 red pepper - cubed
1 green pepper - cubed
1/2 teaspoon of paprika
4 large potatoes - cubes and cooked
3 cloves of garlic - finely sliced
left over corn
eggs for frying should you so desire!

In a hot pan - fry up your rashers some olive for a few minutes, then add in chorizo, cook until your rashers and chorizo are both a little crispy. Drain and put aside. Fry onion in a little of the oil left in the pan - which should have a nice red colour from chorizo. After two minutes add in the garlic, then fry until the onion is starting to turn transparent. Then add in your peppers and thyme, cook for another few minutes until they start to go tender. Stir in the remaining ingredients - and allow to re-heat. Gently turn the mixture every so often to ensure it all gets heated through properly. I like to allow it to stick to the pan a little producing nice little caramelised parts (others may call this burnt - I call it yummy!)

We served this with a fried egg on top - and some freshly chopped chives, and a nice apple chutney on the side. This is a great brunch/lunch/supper dish, really filling and satisfying. You could use any kind of left over pork, ham or chicken or corned beef, as well as combining with any left over cooked veg that you have.

This used up the leftover pork that the lovely Bord Bia sent us, Lola made it into the delicious Roast French Rack of Pork with Apple and Prune Stuffing  My mum used to make bubble and squeak - any recipes for that would be greatly appreciated!

Thursday, May 13, 2010

Leek & Bread Pudding

Twice Baked Bread

I saw this recipe mid-week and just knew I had to make it. One of my favorite things is bread and butter pudding, and this is a savory version including a rich conte cheese and gently carmelised leeks. This recipe comes from the super blog - based out of NYC - Smitten Kitchen. I love her recipes its one of m favorite blogs - so be sure and check it out. She has  a book in the due out in the next few, which is def on my Christmas list (oh hint, hint!)

I followed the recipe exactly at this link. I served it with some fresh - uncoloured smoked haddock, from the fishmonger at the Saturday food market in Temple Bar - I hadn't been there in a while and had forgotten how great it is, for an morning wander and a nibble. 
To prepare the fish - simply poach in milk for 5 minutes, flake over a slice of this bread pudding hot from the oven - it's Saturday lunch heaven. Give Delo an extra large slice cause he bought you a lovely bunch of flowers!!! My pictures don't really convey the texture of the bread too well, it was crispy and crunchy on top, whilst soft, spongy and creamy inside - this is a well recommended recipe and the possibility of endless variations.

Friday, May 7, 2010

Very Full Tart - by Yotam Ottolenghi

Very Full Tart - by Yotam Ottolenghi

Yotam Ottolenghi write the 'new vegetarian' in the Observer on Sunday, I love his recipes, they always full of flavor and colour. This recipe was good if a little time consuming - not quite sure why it took me so long! Maybe roasting the veg for differing amounts of time did it. The blind baking the case, the baking the whole thing.

I've just included the link to the recipe as I followed it pretty much to the T - except I used a large yellow squash that came in our Fruitfellas box - in place of the aubergine - either would be great I'm sure.
This tart was bursting with flavor - the thyme is essential to the overall flavor - and the nice mixture of the ricotta and feta is wonderful with a crumbly pastry casing. Perfect  to bring along to an outdoor Sunday spring/summer lunch. This pie once baked - it was carried bicycle style across the city to Delo who had been working hard on a college project all weekend - mobile dinner - could turn that into a business maybe - what do you reckon?


Tuesday, April 13, 2010

Baked Eggs with Herb and Parmesan Crust

15 minute miracle
For shame out lack of blogging of late, due largely to the good weather and gardening

I have 5 minutes in which to recount this recipe so I'll make it snappy. It's after work, I've cooked dinner, done some gardening and I'm running out the door to rehearsal now. This is a quick and easy recipe which can provide a satisfying meal in less than 15 minutes.

Ingredients
2 eggs
splash of milk
5 chives - chopped
small handful of parsley
1/4 teaspoon of Dijon mustard
A handful of freshly grated Parmesan
Seasoning

Pre-heat the oven to gas mark 8. Grease a ramekin dish. In small bowl combine all the ingredients except the cheese, mix gently to ensure that the yolks remain intact. Place mixture into ramekin dish and top with the grated cheese. Bake on the top shelf of the oven for 8 minutes, until golden and brown and puffy.

I served this with a slice of toasted sourdough (of Lolas making - recipe to follow) rubbed with garlic and drizzled with good olive oil as well as side salad of sugar snap eaps olive oil and sesame seeds.

and I'm off .... into the lovely bright evening


Wednesday, March 24, 2010

Grilled asparagus salad with warm poached egg

Spring is here!


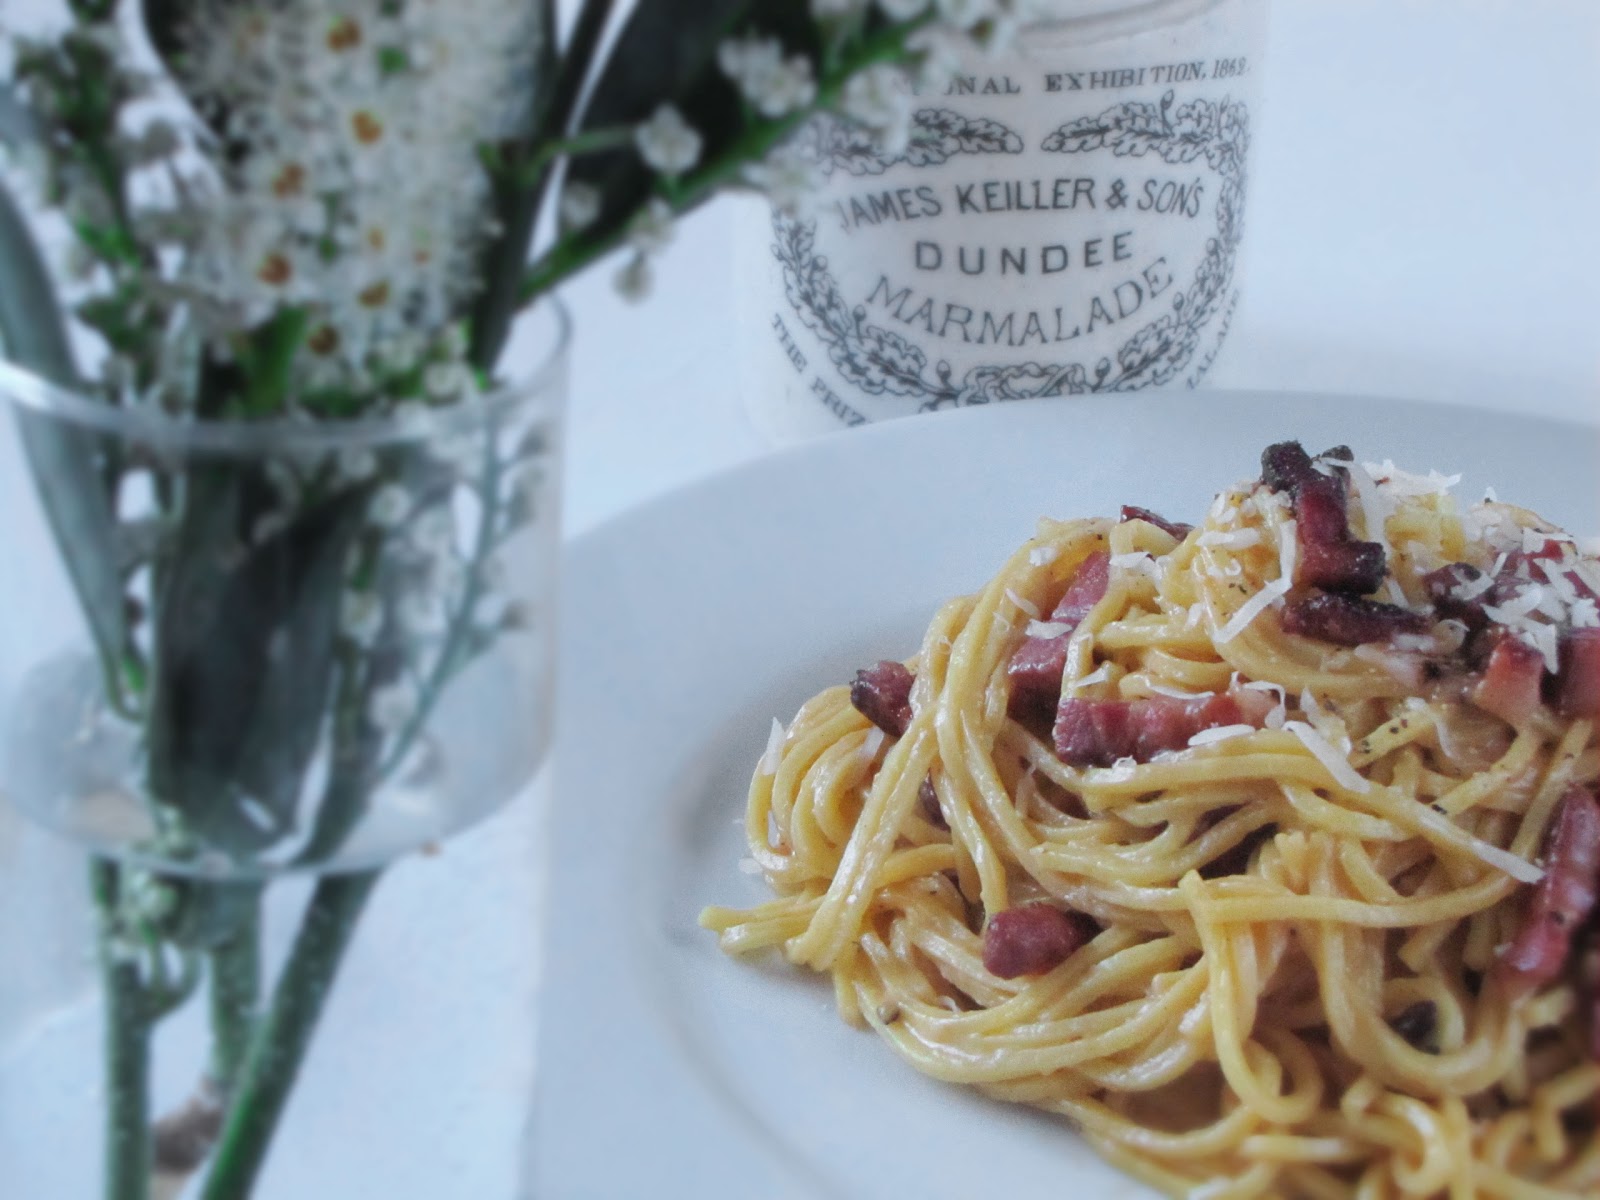
So, I was sick all last week and feeling very sorry for myself. My wonderful mother thought she needed to perform some real old fashioned motherly duties and arrived at our house bearing gifts: a care package containing bunches of flowers and two shopping bags full of lovely treats like papaya, grapes, chocolate Swiss roll, more baked goods than is good for me, a whole chicken, and loads of lovely fresh veggies including two bunches of asparagus. She even hoovered the hall stairs, what an amazing lady! I am now systematically cooking my way through all the delightful ingredients she brought, and last night I whipped up this dish for Lu and I. It tasted even better than it looks!


(for 2 people)
Ingredients:
1 Bunch asparagus
2 eggs
1 tbsp white wine vinegar
2 large handfuls rocket leaves
6 leaves of romaine lettuce
2 slices good crusty Italian (or similar) bread
1 clove garlic
juice of half a lemon
olive oil
mustard
honey

Hold each asparagus spear at either end and bend until it breaks where it naturally should break. Discard the woody ends. Toss the asparagus spears in olive oil and pepper and place under a hot grill. Grill for 4-5 mins on both sides until slightly charred and softened.

Meanwhile, bring a shallow pan of water (about 3 inches in depth) to a rolling boil. Wash the salad leaves and dry. make the salad dressing using 3 parts olive oil to 1 part lemon juice, and about a teaspoon of honey and a teaspoon of mustard (depends on how you like it). Use this to dress the salad leaves.

Toast the bread and cut the garlic clove in half. Rub the cut edge of the garlic all over the slices of toast.

Turn the heat down on the boiling water until it is just simmering. Add the vinegar. Break an egg into a shallow cup or ladle, and tip it as quickly as you can into the water. The idea is to try to get the egg to stay as 'together' as possible while you are tipping it into the water. Do the same with the other egg, you can cook the two of them together in the same pan. Use a slotted spoon to check if the egg is cooked. The white should be firm but the yolk still runny. Give it about 3 minutes.

To serve, assemble the salad & asparagus on the toast and top with the egg. This would also have been nice with some Parmesan shavings or some grilled pancetta.

Lu's new camera has really come into its own, hasn't it! So worth it, look forward to our photos improving even more from here on in!

Tuesday, October 27, 2009

Super Fast Bread & Butter Pudding

My Secret Shame

After a hard days work in the garden, I decided have a nice relaxing bath. As the bath ran my mind turned to dinner, I had three slices of white bread, some cream and eggs..... hmmmm, then it struck me - bread and butter pudding, not really a dinner I know, but hey I deserve it. They've been discussing on the
Guardian - about things people eat when they're on their own - I felt better about this dinner after reading it - some of them are so gross! Yuck - sardine juice on cottage cheese...... dear lord It's very quick and easy to put together, given more time - it's good to leave the bread soak up all the goo for an hour or so, but if you don't have that time - it's still very good. It's great for using up the end of a sliced pan that is a little stale.

Ingredients a few imprecise ones here - sorry!
3 slices of bread (I left the crusts on but you can remove if you prefer)

Butter

Cream
Milk

2 eggs
Raisins

Mixed Peel

2 desert spoons Caster Sugar
1) Butter your bread on both sides and cut into little triangles
2) Put them in a greased oven proof dish

3)Scatter around them the raisins and mixed peel

4) Combine - eggs, milk, cream and caster sugar and mix thoroughly together
5) Pour over the bread making sure that all the bread gets a moist or the dry parts may burn
sprinkle on a little more sugar
6)Bake at gas mark 4 for 30 mins, till solid and a little browned on top. Serve - with cream, custard or ice-cream - or by itself.

Other variations include - throwing in some chocolate chips instead of raisins, or spreading the bread with marmalade after the butter and making mini marmalade sandwich pudding - both of these are delish!

Wednesday, August 26, 2009

Goats Cheese & Red Pepper Tartlet


Refined pie
When feeding 14, a big beef pie is all very well, but we were aware that there would be more sensitive ladies present. So for our two gorgeous blond vegetarians, I whipped together this little beauty. Hey presto - pies for all!
For the pastry:
4 oz flour
2 oz butter
tbsp cold water
For the filling;
1 red pepper
1 small packet soft goats cheese
3 eggs
2 fl oz cream
chives

Make the pastry: sift the flour into a bowl and rub in the butter until the mixture resembles soft bread crumbs. Then add the water and bring it all together using your hands to form a dough. Roll this out on a floured surface and press into a greased pie dish (this will only make enough pastry for a small dish so if you want to make a big tart double the quantities).

Cover the pastry with a piece of greaseproof paper and fill this with baking beans. bake at 180c for about 20 mins, or until the pastry has gone opaque and a bit crusty, but not brown. Then take away the paper and beans and bake for a further 5-10 mins. Don't let the edges brown too much. Remove from the oven.

While the crust is baking, half the red pepper and remove the seeds and the core. Place, skin side up, under a hot grill until the skin has charred all over. Allow to cool and peel the charred skin from the flesh. It should come away easily, but if you are having difficulty, put the hot peppers in a plastic bag and leave them to cool for 10 mins. This should help the skin to come away easier.

Slice the peppers into strips and arrange on the baked pastry shell. Fleck the shell with dollops of the cheese (be generous), and sprinkle over the chopped chives. Beat the eggs and cream, add a little salt and pepper to this and pour it in to the pastry shell. Bake this in your preheated oven at 200c for about 20 mins, or until it is puffy and golden.