Sunday, September 12, 2010
Grilled Peach and Mozarella Salad
This recipe is heavily inspired by (copied from??) a dish Lucy and I ate at Juniors a few weeks ago. It was so delicious we spent the whole time trying to figure out and take note of exactly what was in it. Being the season for stone fruit, we decided it wouldmake a perfect and unusual starter for our alternative to the electric picnic: the Accoustic dinner party (geddit?!)
The dish was a huge success, as was the whole evening, which as planned turned into a big rowdy singalong into the very early hours, which saw us making up alternative lyrics to the tune of 'dirty old town' for the benefit of our American friends. Fun times, huge hangovers the next day!
So try this soon, before peaches are out of season. You wont regret it. But I think its important to get really good quality, creamy mozzerella (we got ours from Little Italy near Smithfield) and very ripe, almost over ripe peaches (or nectarines).
Serves 4
4 large RIPE peaches
1 large ball good quality buffalo mozzerella
4 handfulls mixed leaves, whatever you fancy (we used rockett and baby spinch)
about 16 whole walnuts
1/2 small packet pine nuts
lemon juice
good quality balsamic vinegar
olive oil
salt and pepper
First make the dressing.
Toast the pine nuts in a dry pan over a low flame until they have browned on all sides. Allow them to cool and then grind them up using a pestle and mortar until they look like bread crumbs. Place the ground nuts into a bowl and add enough olive oil to give the mixture a good runny consistency. Add the juice of half a lemon (more if you like) and mix together with a grind of pepper and some salt to taste.
Toast the walnuts in the oven and allow to cool
Using a sharp knife, cut the peaches along their seams, and twist to separate the two halves. If they are ripe this should be easy and the stone should come away easily too. Brush them on both sides with olive oil and add a sprinkle of salt and a grind of black pepper. Place them under a very hot grill for about 10 mins on each side or until they are golden. You could also use a griddle pan if you have one.
To assemble the salad, place the leaves on a plate, add the peach halves and the mozzarella, torn into chunks. Then sprinkle the walnuts over and drizzle over the pine nut dressing. Lastly, drizzle the thick balsamic Vinegar artistically over the whole thing.
Chorizo and Waffle Hash
Chorizo & Potato Waffle Hash
So the first post we ever made was the Waffle Omelette. At the time I wasn’t sure about having a blog, but decided to give it a try. I posted up the waffle omelette and then emailed the blog to Lola - and the rest is history, since then I’ve mostly posted my more serious recipes and pretended I never ate convenience foods. I do love potato waffles though - and have a box in the freezer for food emergencies- actually who am I lying to here - they’re there for hangover emergencies!
We made this the morning / afternoon after our dinner party and LOVED it, in the way you can only love food the morning after the night before.
Serves 2
6 pieces of chorizo
1 onion
some garlic crushed
some red and yellow pepper - diced
Fresh thyme
fresh parsley
6 Birdseye potato waffles
2 eggs
Fry the onion over a med/high heat along with the chorizo, after 2 mins throw in the garlic - cook for another two mins or so and then add in the thyme and peppers. While you’re doing this you can grill the waffles (it’s the only way for me!) Then in a separate pan- fry up two eggs as you like them (both our yokes cracked - but we weren’t prepared to start again.
When your waffles are crispy and golden brown - break them up - add to the chorizo and onion mixture - pile onto two plates top with a fried egg and a generous sprinkling of black pepper - and you‘re good to catch the re-run of x-factor.
So the first post we ever made was the Waffle Omelette. At the time I wasn’t sure about having a blog, but decided to give it a try. I posted up the waffle omelette and then emailed the blog to Lola - and the rest is history, since then I’ve mostly posted my more serious recipes and pretended I never ate convenience foods. I do love potato waffles though - and have a box in the freezer for food emergencies- actually who am I lying to here - they’re there for hangover emergencies!
We made this the morning / afternoon after our dinner party and LOVED it, in the way you can only love food the morning after the night before.
![]() | |
| Picture doesn't do this justice! |
6 pieces of chorizo
1 onion
some garlic crushed
some red and yellow pepper - diced
Fresh thyme
fresh parsley
6 Birdseye potato waffles
2 eggs
Fry the onion over a med/high heat along with the chorizo, after 2 mins throw in the garlic - cook for another two mins or so and then add in the thyme and peppers. While you’re doing this you can grill the waffles (it’s the only way for me!) Then in a separate pan- fry up two eggs as you like them (both our yokes cracked - but we weren’t prepared to start again.
When your waffles are crispy and golden brown - break them up - add to the chorizo and onion mixture - pile onto two plates top with a fried egg and a generous sprinkling of black pepper - and you‘re good to catch the re-run of x-factor.
Hash is an American invention - yes? Invented by cowboys I believe!
Hazelnut Meringue with Apricot Filling
![]() |
| Ah lovely background with mini - accordian and pack of fags! |
6 egg white
12oz caster sugar
4 oz ground hazelnuts
6oz dried apricots soaked overnight in water
1 inch of cinnamon
Juice of two oranges
2 inch piece of orange rind
2 tablespoons of brown sugar
500 ml single or double cream
Extra hazelnuts for decorating - I used 18 - that was 1 oz!
3 cake tins - lightly oiled and lined with parchment on the bottom.
I started out by toasting the hazelnuts until golden - toast a few extra as you’ll eat a few. Pop them out of their skins and roughly blend them in a blender, not forgetting to keep a few extra whole over to decorate the top of the dessert when done.
Separate out your eggs - being super careful not to allow any yolk in - otherwise your meringue will fail miserably. Also worth washing your utensils just before starting the meringue - as any dirt or grease could affect the fluffiness of your egg whites- leaving you with one flat meringue.
Put the 6 egg whites in a bowl / food processor with whisk attachment - and whisk until they form soft peaks. Then slowly add in the caster sugar spoon by spoon. The whites should stay smooth and get a little glossy. Then fold in the ground hazelnuts gently with a metal spoon.
Spoon the mixture into the tins and bake at the middle of the oven for 30 mins at Gas Mark 5.
Now make the apricot filling. Drain the apricots over a bowl. Add 4 tablespoons of the soaking liquid into the pan with the fruit cinnamon, brown sugar, orange peel and juice. Bring to a gentle simmer and let it bubble away for about 20 minutes until the apricots are breaking apart. Add more of the soaking liquid if it appears to be getting too dry..
Remove the meringues from the oven - they should have a light brown tinge. Leave to cool in the tins for 15 mins before turning them out onto a wrack to cool fully. Just before serving assemble the meringue - put one meringue with half of the apricot mixture and a third of the whipped cream. then another meringue followed by the rest of the apricot filling, more cream, meringue and then the rest of the cream and a few toasted hazelnuts. This dessert is pretty sweet - so if you prefer a less sugary dessert - I recommend you try something else - but for sugar junkies - this will be a tasty hit!
Monday, September 6, 2010
Oven Roasted Tomato & Caramelised Garlic Bruschetta
Never Mind the Electric Picnic here's the Acoustic Dinner Party
So to distract ourselves from the fact that we weren’t at Electric Picnic - we had some friends over for dinner on Saturday night - the menu was loosely summer Italian, I really enjoyed all the courses - especially the starter which was inspired by a meal we had at Junior’s in Ringsend recently. If you haven’t been you should try it - it’s a great restaurant. I’ve been there twice recently - for dinner and brunch!
Ingredients
Makes 9
1 head of garlic
18 baby tomatoes
3 teaspoons of Maldon Sea Salt
3 teaspoons of Caster Sugar/Light Brown Sugar
Olive Oil
Good quality sourdough bread
1 clove of garlic
Cut the whole head of garlic across the middle - so that each clove is cut in half. Mix together the salt and sugar in a bowl. Then dip the head of garlic cut side down into the mixture - so that it sticks. Then on a oven proof tray - put the remaining sugar and salt in two piles. Place the two pieces of garlic cut side down on the two piles. Cover the garlic with tin foil. Place in the oven at gas mark 6 for 30 mins until they are tender.
While these are cooking - coat the tomatoes in a little olive oil and bake these along with the garlic - so they should be ready at the same time. If you have them on the vine keep them that way - as they’re less likely to loose their delicious juices in the roasting process.
Remove the garlic and tomatoes from the oven and allow to cool. Then pop them out of the skins, mix together in a small bowl to form a paste with a small bit of olive oil.
Toast the sour dough - spread each piece of toast with a little purred garlic and top with a few torn basil leaves and two tomatoes.
This is the smallest part of the dinner but thought I’d better start today or we’ll never get it all down. Stay posted for the next five installments - yup 5! Wow we’re mad as a pastry brush around here
So to distract ourselves from the fact that we weren’t at Electric Picnic - we had some friends over for dinner on Saturday night - the menu was loosely summer Italian, I really enjoyed all the courses - especially the starter which was inspired by a meal we had at Junior’s in Ringsend recently. If you haven’t been you should try it - it’s a great restaurant. I’ve been there twice recently - for dinner and brunch!
![]() |
| Pre-dinner Nibbles |
Ingredients
Makes 9
1 head of garlic
18 baby tomatoes
3 teaspoons of Maldon Sea Salt
3 teaspoons of Caster Sugar/Light Brown Sugar
Olive Oil
Good quality sourdough bread
1 clove of garlic
Cut the whole head of garlic across the middle - so that each clove is cut in half. Mix together the salt and sugar in a bowl. Then dip the head of garlic cut side down into the mixture - so that it sticks. Then on a oven proof tray - put the remaining sugar and salt in two piles. Place the two pieces of garlic cut side down on the two piles. Cover the garlic with tin foil. Place in the oven at gas mark 6 for 30 mins until they are tender.
While these are cooking - coat the tomatoes in a little olive oil and bake these along with the garlic - so they should be ready at the same time. If you have them on the vine keep them that way - as they’re less likely to loose their delicious juices in the roasting process.
Remove the garlic and tomatoes from the oven and allow to cool. Then pop them out of the skins, mix together in a small bowl to form a paste with a small bit of olive oil.
Toast the sour dough - spread each piece of toast with a little purred garlic and top with a few torn basil leaves and two tomatoes.
This is the smallest part of the dinner but thought I’d better start today or we’ll never get it all down. Stay posted for the next five installments - yup 5! Wow we’re mad as a pastry brush around here
Labels:
Basil,
Bruschetta,
carmelised,
garlic,
Healthy,
Herbs,
Italian,
Party Snack,
Roasted,
Summer,
Tomato,
Vegan,
Vegetarian
Friday, September 3, 2010
Cheffactor
Win the once in a lifetime opportunity to study at Ballymaloe cookery School with Rachel Allen and become a super fantastico Chef extraordinaire!
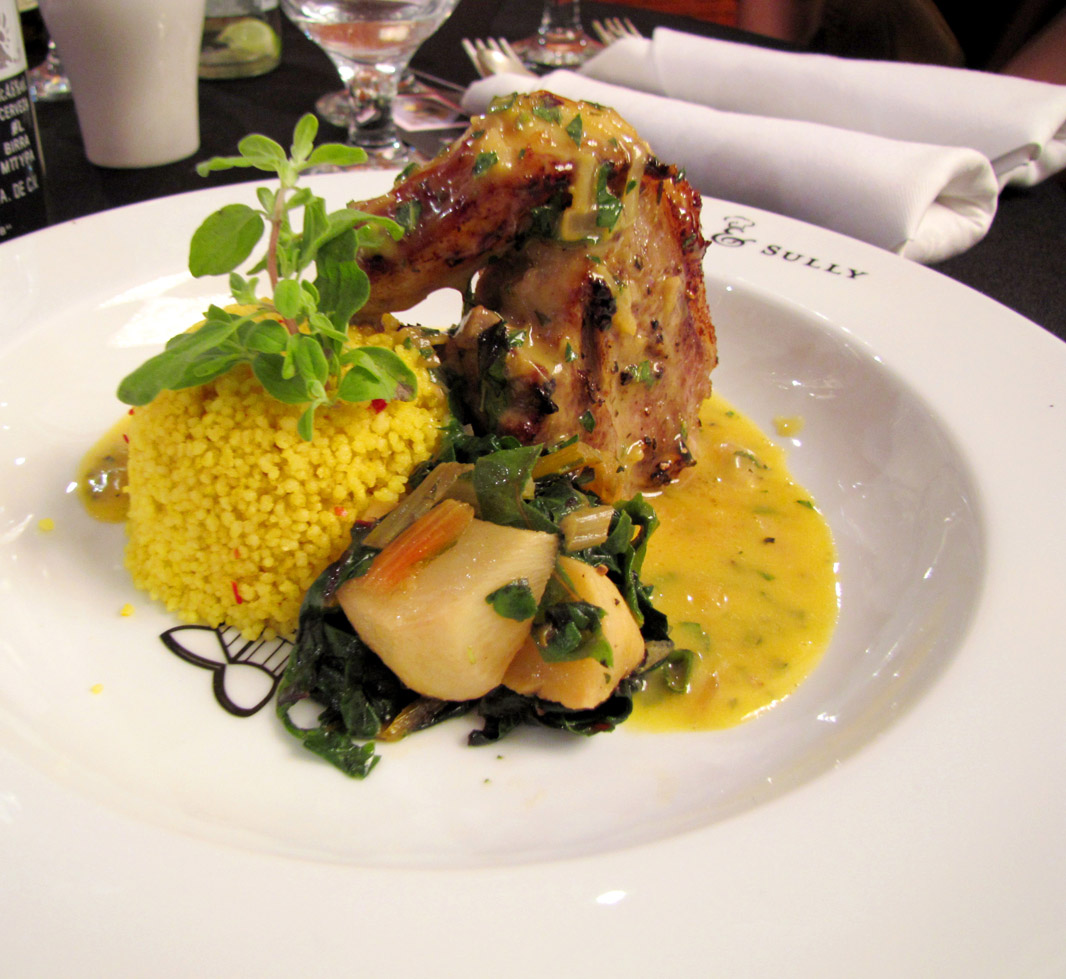
I was at the launch of Cheffactor this week in the Westbury - sponsored by the lovely Cully & Sully, who were there in person. We watched a cookery demonstration by Ivan Whelan - the chef behind most of the Cully and Sully recipes. He cooked some lamb steaks with saffron and pink pepper cous cous - served with Bernnaise Sauce and rainbow chard and white turnip. Lots of great exotic ingredients - also an amazing chocolate mint - that tasted like an after eight. Ivan informed us that these amazing herbs were all grown in the organic farm that is part of the Ballymaloe School - I was impressed to say the least.
Whilst sampling this great food the competition was explained to us. It's pretty simple, you have to upload a beautiful picture of you and your signature dish - photo to include the Cully and Sully logo. Then write a small paragraph about your dish and another paragraph about your dish. Then there will be a public vote - 2 finalists are chosen this way -and another finalist is chosen by Cully & Sully.
The final sees the three contestants cook their dish for the panel which included Darina and Rachel Allen - gasp! Then somebody is crowned champion and goes to live at the cookery School for 12 weeks. They also get a set of professional knives to help them on their way.
So what a prize - I'll def be entering -I was thinking of using this photo to enter?
![]() |
| Me & Sully! Now I'm a great fan of the giant ham sandwich, but it may not be enough to impress Darina Allen, so it's back to the drawing board I guess! |
Thursday, September 2, 2010
Black Pudding Photoshoot
Lovely Limerick Pudding
Here's a sneak preview of some shots I took for my friends. They are soon to open a shop in Limerick in the old potato market. I took these snaps a few weeks ago. I also visited the Limerick market for the first time in years, it was great, bustling with people, full of delicious smells and heaving with great quality food, fresh veg, tasty pastries and a great fish shop. My friend is the experienced chef, Anne Lloyd. I wish them all the best when the open the doors next month. Here's a taster of some of their produce. They have a wonderful black pudding - some earthy subtle flavours in there, it's sure to fly out the door
![]() |
| Terrine |
![]() |
| Black Pudding, Scallops and Pea Puree |
![]() |
| Black Pudding with Poached Egg Starter |
![]() | |
| Black Pudding Loaf |
![]() |
| Wonderful Baked Limerick Ham - the World's Finest! |
![]() |
| Poster Sample - it's def cheaper than 4.50 too |
Let me know what you think of the pictures - it was a long weekend working on them - but I got to sample the produce of course as an added bonus!
Sunday, August 29, 2010
Mum's Chocolate Cake
Cake is gonna get you!
![]() |
| Here's Cake-ie! |
My mum has been making this cake ever since I can remember - I think she got the recipe from Martha down the road - but I'm claiming it for my mum. Any occasion of note which involved kids saw this cake getting whipped up. It's a moist and delicious and appears a lot more complex than the simple recipe that makes it. The secret ingredient is black treacle - I won't hide it from you!
Ingredients
9oz Caster Sugar
9oz Self Raising Flour
9oz Butter
3 eggs
2 tablespoons of Cocoa Powder
1/2 teaspoon of Baking Powder
1 tablespoon of Black Treacle
A dash of milk
For the icing
5oz of Icing Sugar
1.5oz Cocoa Powder
2oz Caster Sugar
3 tablespoons Water
3 oz Butter
Preheat the oven to Gas mark 4/180oc, and grease 2 circular cake tins, and line the bottoms. I used cake tins that had a diameter of 10 inches.
Sift the flour, baking powder and cocoa powder together in a large bowl. Add in the softened butter, eggs, treacle and the milk. Blend them all together until very well mixed, add more milk if the mixture appears too chick. Spoon into the tins and bake at the centre of the oven for 40 mins.
Meanwhile you can prepare the icing. Sift the icing sugar and the cocoa powder into a bowl. Place the caster sugar, water and butter in a small pan.
When the cake is cooked it should spring up from a gentle press down, or a skewer should come out clean when poked into the centre. Remove gently form tins and allow to cool.
To make the icing - melt together the contents of the pan and then mix into the icing sugar mixture. If the mixture is a little thick for spreading - just add the smallest dash of boiling water and that should loosen it out a small bit. Similarly if it's to runny you could sieve in some more icing sugar. Spread over and between the two cooled sponges and you're done.
Decorate with chocolates and marshmallows for kids - or give it a dusting of icing sugar or cocoa powder for the adults. You can also make this in a tray and slice out little squares. It looks a bit like a scary ominous monster in this photo I think! It's the cake for every chocolate cake moment
Subscribe to:
Posts (Atom)